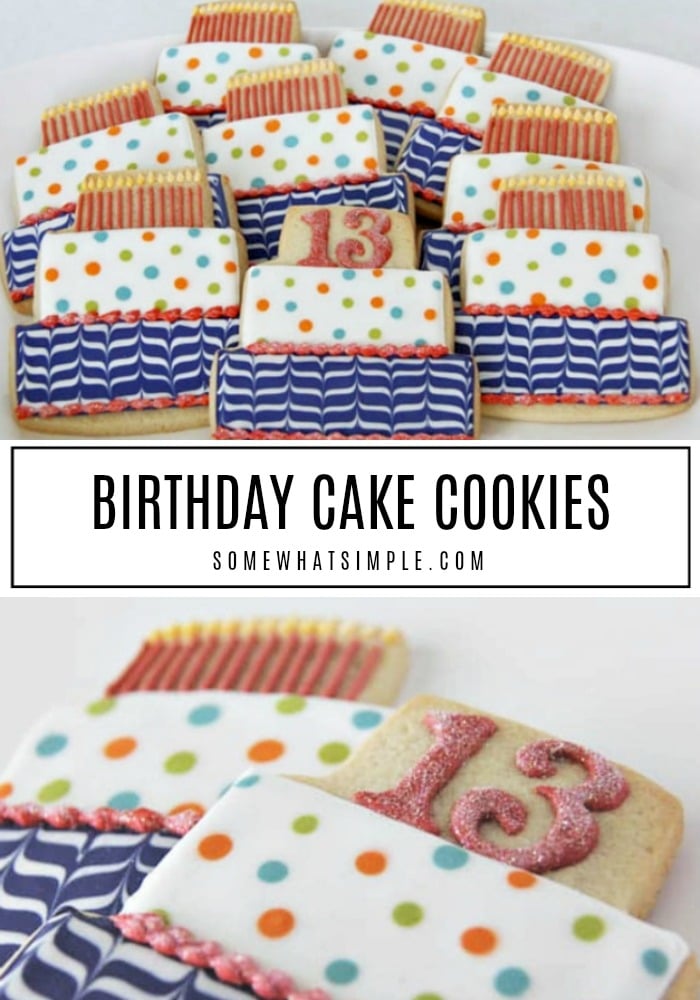
How to make the cutest birthday cake cookies, with pictures of every step in the process! Making darling cookies has never been so easy!
Here are a few more birthday treats we think you’ll love – Birthday Cake Ice Cream, Sprinkle Pancakes, and Gourmet Cupcakes.
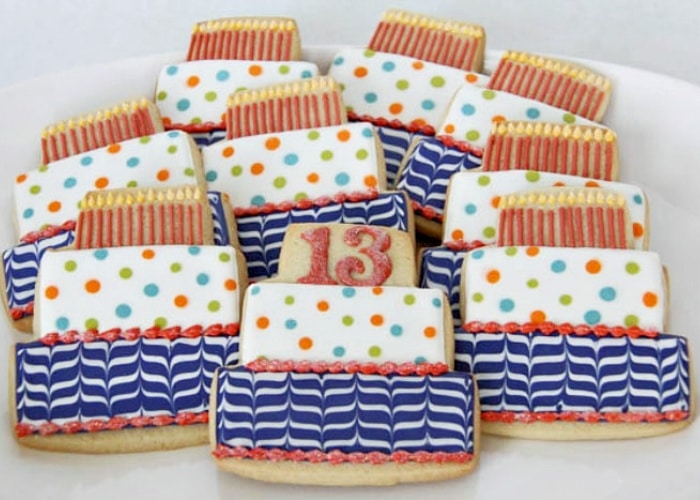
My oldest daughter requested sugar cookies on her thirteenth birthday instead of a cake. (Who doesn’t like birthday cake?!) But rather than trying to convince her that cake is delicious, and birthday cake + candles are a tradition, I decided to make her these birthday cake cookies, and she was in heaven!!!
How to Make Birthday Cake Cookies
While very simple and straight forward, these cookies do have several steps and lots of drying time in between. You can definitely simplify them with solid color cake layers, but here are the instructions to achieve the look that I created –
HELPFUL TIPS –
- For both of the cake layers, I did an outline in a thick consistency icing, then I flooded the inside with a thinner (7-8 second) consistency icing of the same color.
- For the wet on wet technique, I used the same thin consistency as the fill in a different color.
- For more on getting your icing just right, refer to my Decorating with Royal Icing Tips + Tips for Making Sugar Cookies
SUPPLIES –
- sugar cookies in the shape of a 3-tier cake, baked and cooled
- Royal Icing in various colors. I prefer to use my icing in Squeezie Bottles
- rainbow disco dust + paint brush
DIRECTIONS –
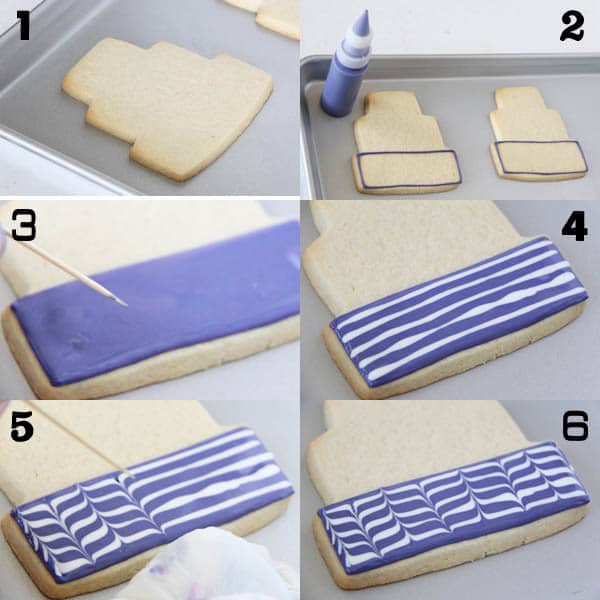
For the bottom layer “marble” technique
- Place your cooled cookies on a flat work surface.
- Outline the bottom layer in a thick consistency icing.
- Fill the inside with a thinner (7-8 second) consistency icing of the same color, then pop any bubbles.
- While the icing is still wet make some horizontal lines. (They don’t need to be anywhere near perfect!)
- Run a toothpick up, then down and so on. You decide how close together you want your drags to be. I wasn’t going for chevron, or zebra, just some crazy/fun stripes.
- Let this layer dry for several hours before starting the next to prevent bleeding.
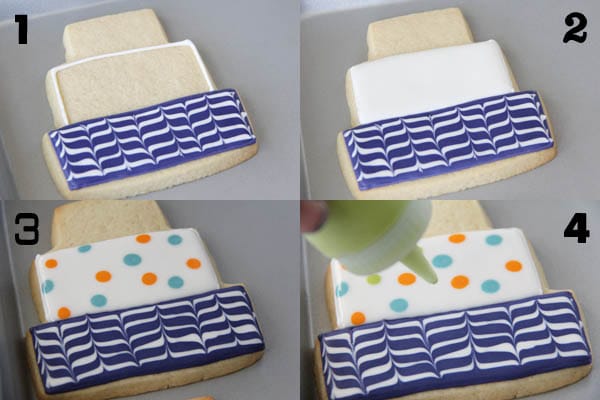
For the second layer “wet on wet polka dot” technique
- Outline your second layer in a thick consistency icing.
- Fill the inside with a thinner (7-8 second) consistency icing of the same color, then pop any bubbles.
- For the wet on wet polka dot technique – make various colors of icing to be the same thin consistency as the icing you used to fill the 2nd layer.
- While the icing is still wet, make some colorful polka-dots.
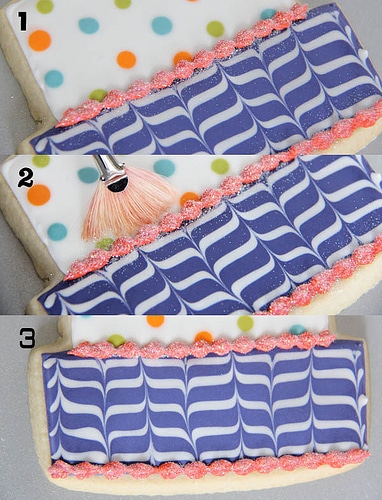
For the cake trim –
Before doing the trim, make sure your other layers have dried for almost 24 hours.
- I trimmed out the cake with a layer of pink frosting. I used a #16 tip and used the touch, up and over, and drag…repeat technique. (I don’t know the “official” name of this – it’s just what my mom called it and it has stuck with me all these years!) Right after I did the trim, I sprinkled rainbow disco dust on it.
- After that dries, wipe away the excess glitter with a paint brush.
- If the rest of the cookie was dry enough, it should wipe away clean!
For the candles –
- I took the tip off my pink icing and put a #2 tip on and I made thirteen little lines.
- For the candle flames, I made a little yellow dots with a #2 tip and dragged them up a bit.
- I wanted the flames to sparkle, but my candles hadn’t dried long enough, so I covered them with a piece of paper and then sprinkled my disco dust.
- After it was all dry, I could brush away any excess.

And to make the birthday girl’s a little extra special, she got number shaped candles.
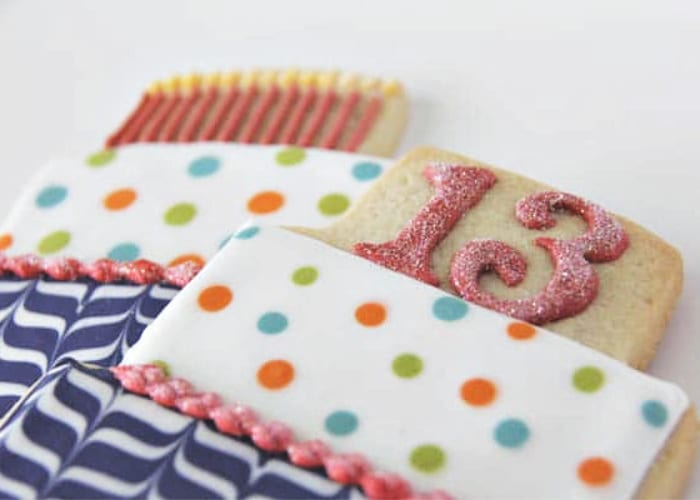
Between the colors and the glitter, this little group of cookies is really fun!
More Fun Cookie Decorating Ideas
- 4th of July Cookies
- Bumble Bee Cookie Recipe
- Halloween Mummy Sugar Cookies
- Mickey & Minnie Mouse Sugar Cookies
- Turkey Handprint Sugar Cookies
ABOUT THE AUTHOR: Ashleigh is a creative mom of three and the blogger from Bee in Our Bonnet. Ashleigh spent a few years blogging on Somewhat Simple as our Baking Contributor.


Your cookies look really great!
SUPER CUTE!! I don’t have the patience to do anything quite that complicated. However, I’m very appreciative of the skillz of those who are! 🙂 I’m sure this young lady will be thrilled with the cookies you made.