Making a plant cell model is a great way to have some fun with your kids in the kitchen! This fun, edible science project is both educational and tasty!
Looking for more activities and projects to do with your kids? Here are a couple more we love – Fun at the Train Station, and No TV, No Problem!
A 3D Science Project Assignment
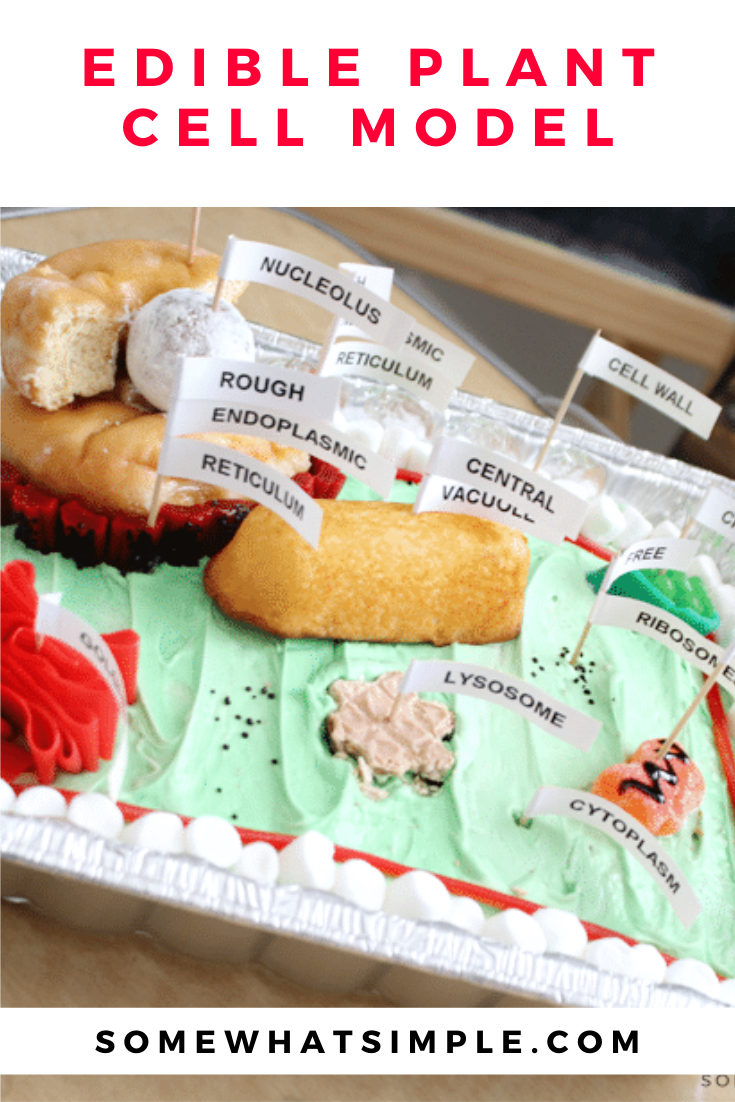
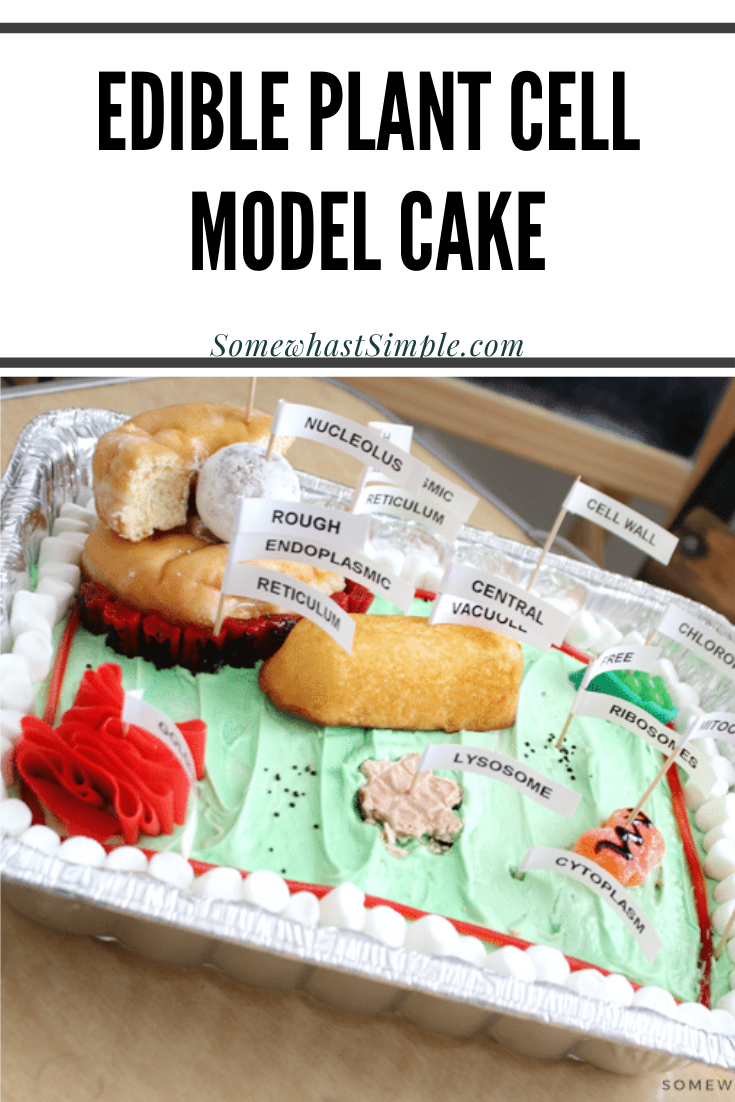
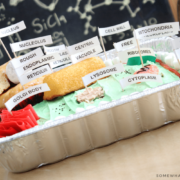
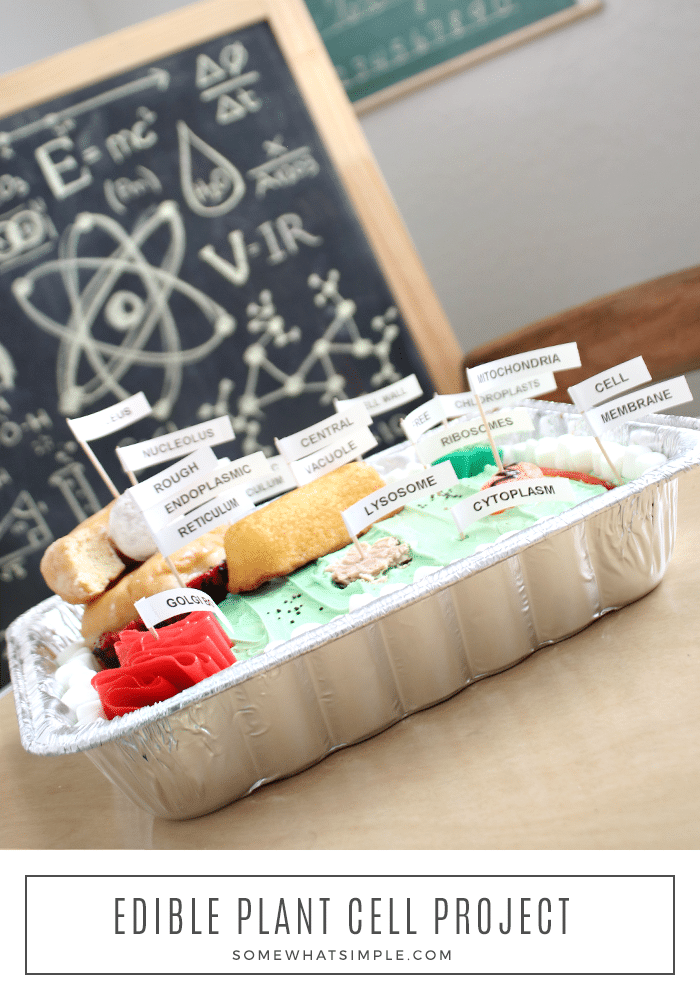
My sixth grader came home with the assignment to make a 3D model of a plant cell. We were given no guidelines as far as what it needed to look like or what materials we had to use. We decided to get a little creative and made it using a cake and other items so the entire model would be edible!
Making this plant cell model proved to be much more fun than the styrofoam animal cell I made with his older sister a couple of years ago! Here is what we used and how we made it –
How To Make An Edible Plant Cell Model
MATERIALS + INGREDIENTS –
- One vanilla cake mix + ingredients on back of box
- disposable rectangle pan (as close to 13×9 as you can)
- Toothpicks
- Plant cell labels (download below)
- Scissors
- Tape
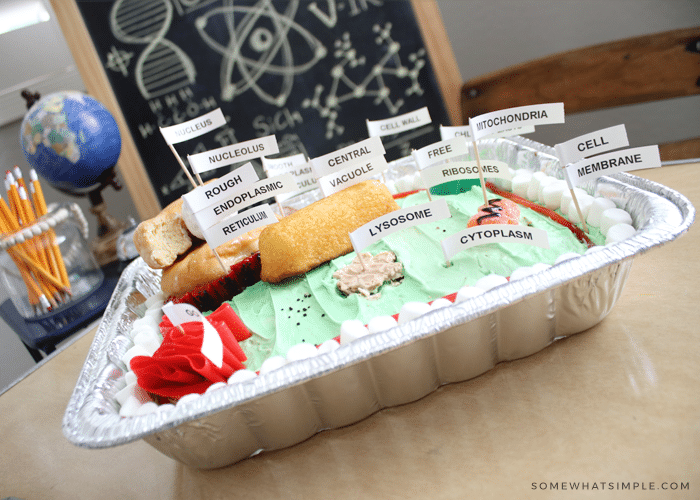
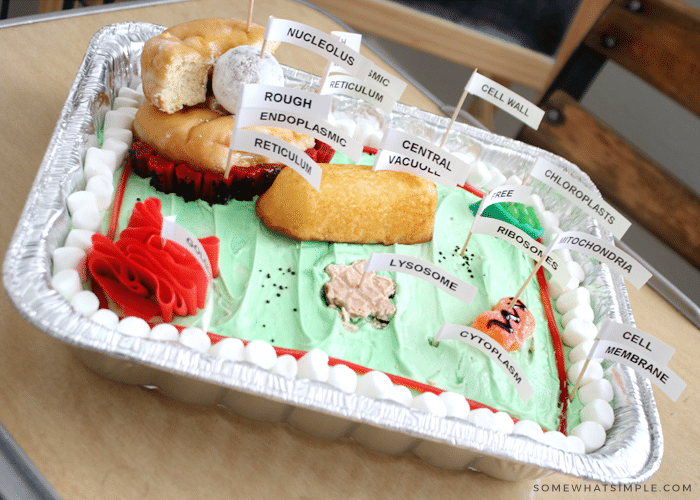
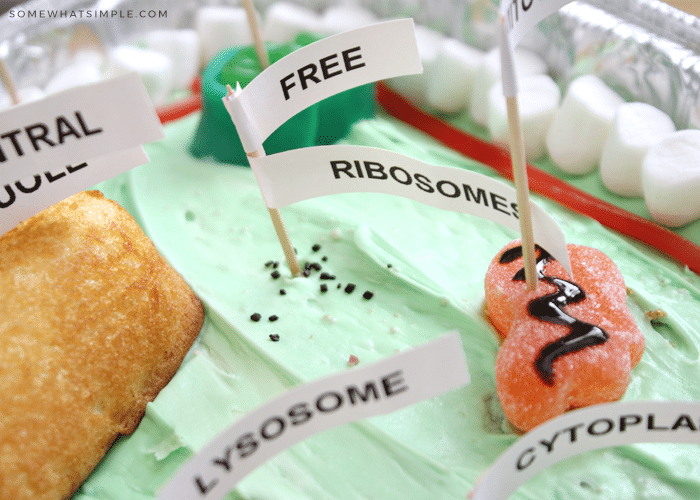
- Plant cell parts –
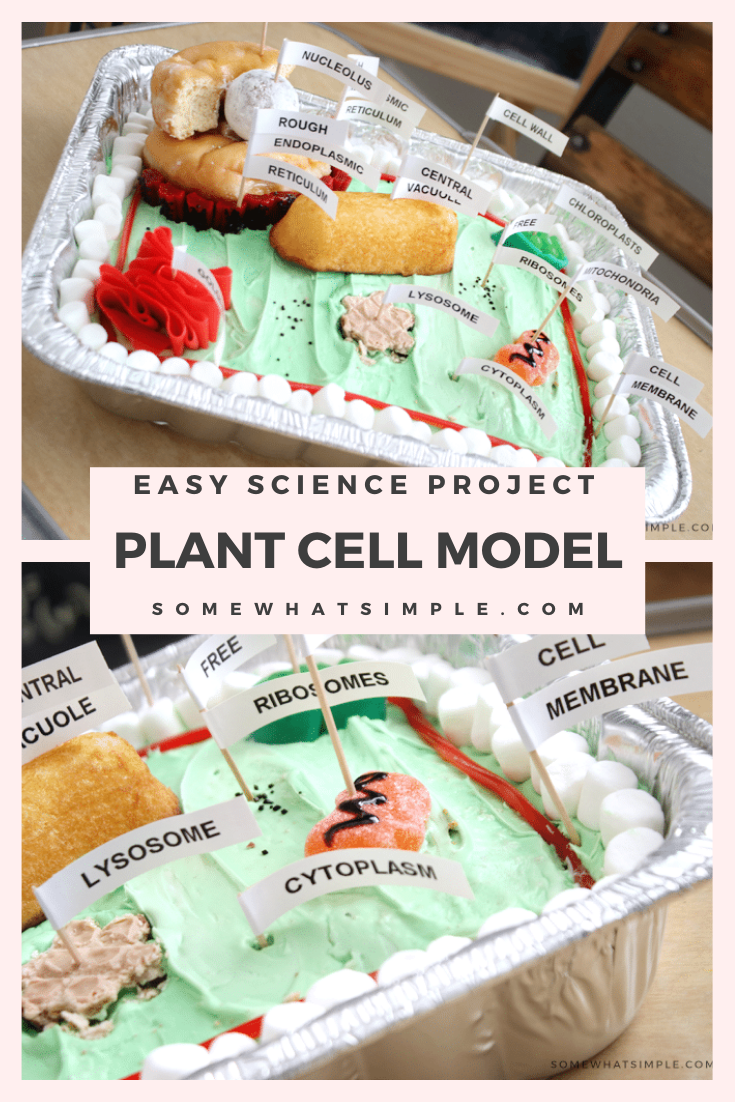
- cell wall — mini marshmallows
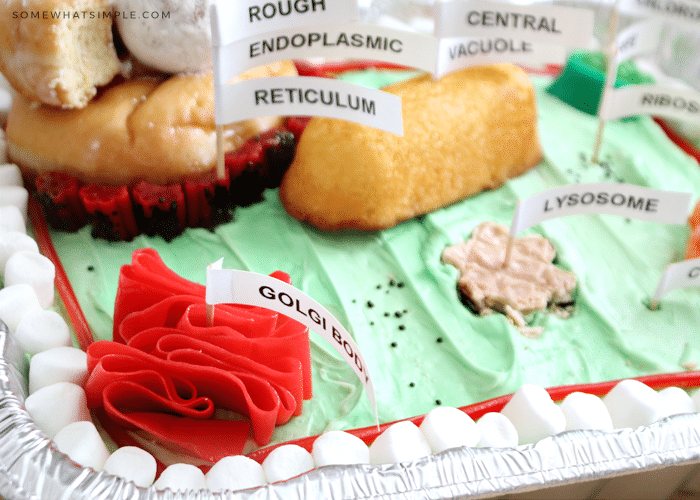
- cell membrane — red licorice
- cytoplasm — green frosting
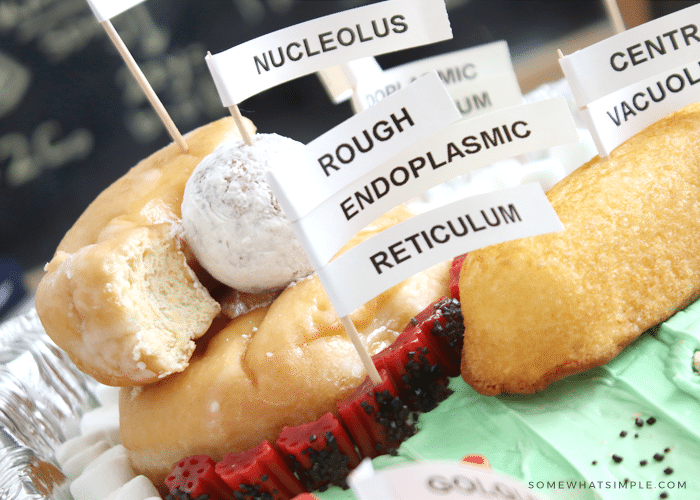
- nucleus — 2 glazed donuts, 1 cut in half
- nucleolus — powdered sugar donut hole
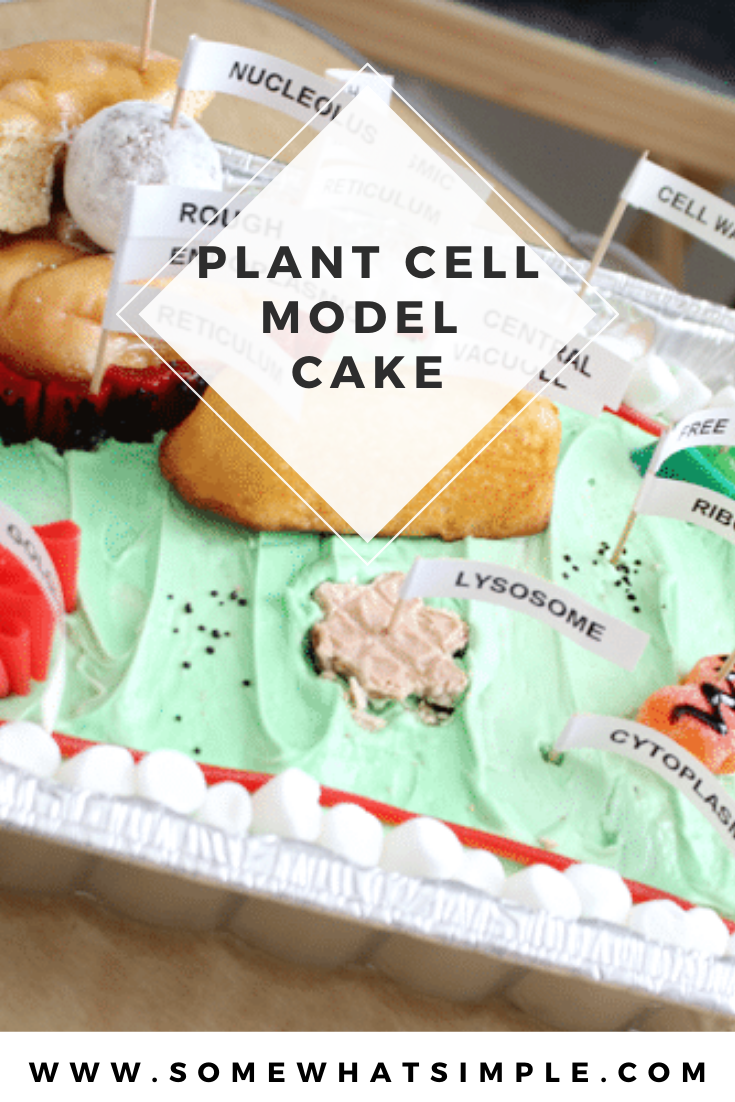
- central vacuole — Twinkie
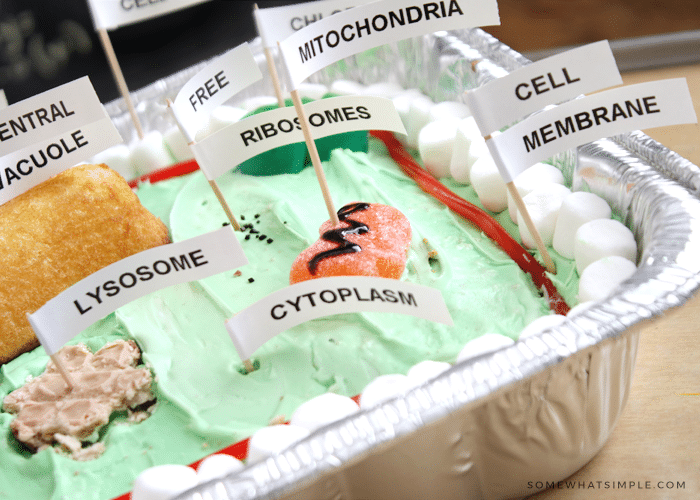
- mitochondria — orange slices gummy candy + black cookie icing
- smooth endoplasmic reticulum — red licorice bites
- rough endoplasmic reticulum — water, red licorice bites + black sprinkles
- free ribosomes — black sprinkles
- chloroplasts — green Mike & Ikes + a green Airhead
- Golgi body — Fruit by the Foot
- lysosome — wafer cookie
DIRECTIONS
- Base – Make your cake according to package directions in your disposable cake pan. Let it cool completely.
- Cytoplasm – Add your “cytoplasm” by spreading green frosting over the entire cake.
- Cell Wall – Place mini marshmallows around the entire perimeter of the cake to form your “cell wall.”

- Cell Membrane – Add a “cell membrane” by putting red licorice on the frosting, up against the row of marshmallows around the entire perimeter of the cell.
- Nucleus – Place your “nucleus” in the corner – one donut on the frosting, then half of a donut sitting on top of that donut.
- Nucleolus – Place your “nucleolus” on top of your donut, up against the halved donut.
- Central Vacuole – Place a Twinkie on the cake to represent the central vacuole.
- Mitochondria – Make your “mitochondria” by drawing a squiggly line with black frosting on top of an orange candy slice. Place this on your cell.
- Smoot Endoplasmic Reticulum – Add a border of red licorice bites around half of one side of your nucleus donut. This will be the smooth endoplasmic reticulum.
- Rough Endoplasmic Reticulum – Coat several pieces of licorice bites in water, then roll them in black sprinkles. Line them up next to your smooth endoplasmic reticulum to finish the border around your donut. These will represent the rough endoplasmic reticulum.
- Ribosomes – Sprinkle some black sprinkles in a few clusters on top of your frosting to represent the free ribosomes.
- Chloroplast – To make a chloroplast, cut a green airhead in half, lengthwise. Wrap the airhead around to form a circle, then stick it into the frosting. Fill the inside of the Airhead circle with green Mike & Ikes that are standing on their ends.
- Golgi Body – Unwrap a fruit by the foot, then fold it “accordion style” and stick in on your cake. This will be the Golgi body.
- Lysosome – Place a wafer cookie on your cake to be a “lysosome.”
- Label It – Download and print the cell parts printable, then cut each label out. Wrap one end of each label around a toothpick, and tape it to secure. Stick a toothpick and label into each plant part, and you’re done!!!

Plant Cell Model Labels Printable
Enter your name and email address below for immediate access to these free plant cell model labels –
This edible plant cell project is such a fun science project, right?? And for those of you who care, he got an A+. 😉
Edible Plant Cell Recipe
Ingredients
- 1 box vanilla cake mix
- 1 package mini marshmallows
- 1 package red licorice
- 1 container green frosting
- 2 glazed donuts
- 1 powdered sugar donut hole
- 1 Twinkie
- 1 package orange slices gummy candy
- 1 package black cookie icing
- 1 package red licorice bites
- 1 bottle black sprinkles
- 7 green Mike & Ikes
- 1 green Airhead
- 1 Fruit by the Foot
- 1 wafer cookie
Instructions
- Make your cake according to package directions and let it cool.
- Spread green frosting over the entire cake.
- Place mini marshmallows around the entire perimeter of the cake
- Place red licorice on the frosting, up against the row of marshmallows around the entire perimeter the cake
- Place one donut on the frosting, then half of a donut sitting on top of that donut.
- Place your “nucleolus” on top of your donut, up against the halved donut.
- Place a Twinkie on the cake
- Draw a squiggly line with black frosting on top of an orange candy slice. Place this on the cake.
- Add a border of red licorice bites around half of one side of your nucleus donut.
- Coat several pieces of licorice bites in water, then roll them in black sprinkles. Line them up next to your smooth endoplasmic reticulum to finish the border around your donut.
- Sprinkle some black sprinkles in a few clusters on top of your frosting.
- Cut a green airhead in half, lengthwise. Wrap the airhead around to form a circle, then stick it into the frosting. Fill the inside of the Airhead circle with green Mike & Ikes that are standing on their ends.
- Fold the fruit by the foot “accordion style” and stick in on your cake.
- Place a wafer cookie on your cake.
- Label each part of the cell
Equipment
- Toothpicks
- Plant cell labels (download below)
- scissors
- Tape
- Aluminum baking tray
Nutrition
Other Notes


This is perfect for my son’s science project. Thank you!
I’m glad you found it helpful! Thanks for stopping by!
I am very grateful for your help. I want to help my grandson with his cell project and this is a God send. 😀
I’m so glad you found this helpful! Thanks for your nice comment!
Using this for Science Class. Thanks! 🙂
This is saving the day on a last minute project! Thank you for your details and printable! Happy Day!
You’re so welcome…I’m glad it helped you out!
I can’t find the printable labels. Did I miss them somewhere?
I’m so sorry about that! We just did a site update and a lot of our printable forms were deleted. I just added the form back, so you should see it near the bottom of the post. Thanks so much for letting me know!
I loved it
Thanks Ashleigh!
👍
Thanks!
going to have to do this for my biology project
It’s such a fun project to make. Let me know how it turns out.
This idea is so clever! I love everything you did with this. The kids will loved it!
Thanks!
This was so much fun! I wish I did science projects like this when I was in school. haha
I know, right?!
My kids love science & eating..lol! This was such a fun project to do during this home schooling time! Thanks!
I’m so glad they enjoyed it!