


Easy chocolate-dipped ice cream cones are a fun 3-ingredient treat for any holiday or celebration and can be ready in 10 minutes or less!
If you live anywhere near the surface of the sun (hi from Phoenix!), you know that summer survival = ice cream. It’s not optional. It’s basically hydration.
So when the 4th of July rolls around and I want something festive, easy, and cute enough to make people think I “planned ahead”… these chocolate-dipped ice cream cones are it.
They’re colorful. They’re ridiculously simple. And they require just three ingredients.
We made ours red, white, and blue for the 4th of July, but honestly? You can swap the colors and use this same idea for Christmas, Halloween, Valentine’s Day, birthdays—whatever you’re celebrating. It’s the kind of recipe that works year-round and makes you look like the fun mom without actually doing much work.
Win-win.

How To Make Dipped Ice Cream Cones
If you’re hosting a summer party and need something quick, this is your answer. You could easily make enough for the entire neighborhood without breaking a sweat.
Ingredients –
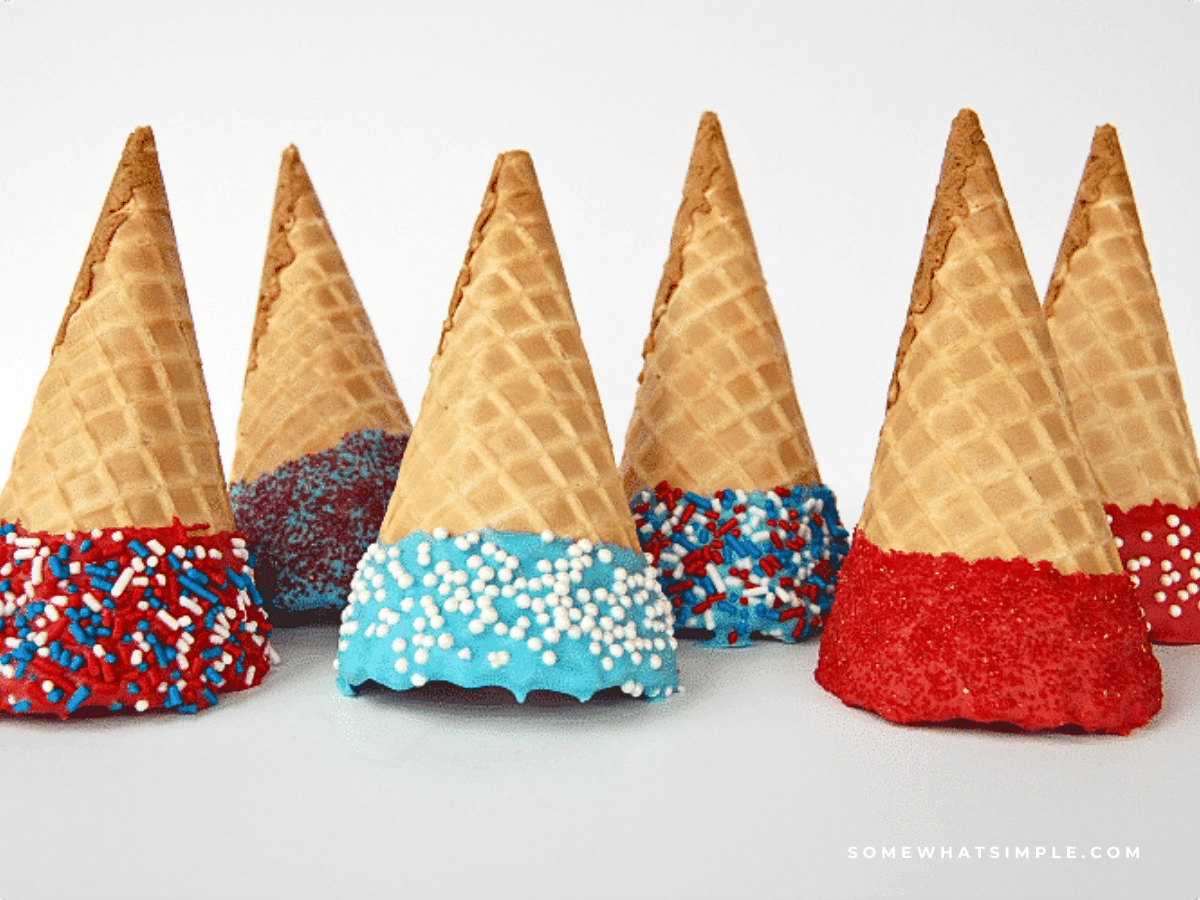
- 6 waffle cones
- 12 oz candy melts (we used red, white, and blue)
- ¼ cup sprinkles
That’s it. Three ingredients. No complicated steps. No fancy tools.
Directions –
- Prep – Lay out a sheet of wax paper on a hard, flat surface.
- Melt – Melt the candy melts according to the directions on the package. (Usually just a quick microwave session with stirring in between.)
- Dip – Turn each cone upside down and dip the top fourth of the cone into the melted candy. If you need a little more control, use a spoon to help coat the cone evenly.
*** Tip: Pull the cone straight up after dipping so the excess candy drips off cleanly. This helps avoid thick clumps and messy edges. - Decorate – While holding the cone over the wax paper, sprinkle your toppings over the melted candy. Work quickly—candy melts set fast!
- Cool & Store – Place the cones upside down on the wax paper and let them sit until the coating hardens. If you’re not serving them right away, store them in an airtight container until party time. Then just scoop in your favorite ice cream and serve.
Grab the kids and let them help dip and decorate. It’s messy in the best way, and they’ll feel like they made something special.
More Easy Patriotic Recipes
- Red, White & Blue Cupcakes
- Patriotic White Chocolate Popcorn
- Layered Red, White and Blue Drink Recipe
- Patriotic USA Sugar Cookies
- Patriotic Jello Cookie Recipe

Dipped Ice Cream Cones Recipe
Ingredients
- 6 Waffle Cones
- 12 oz Candy Melts, We used Red, White and Blue
- 1/4 cup Sprinkles
Instructions
- Lay out a sheet of wax paper on a hard, flat surface.
- Melt the candy melts according to the directions.
- Turn cones upside down and dip into candy melt, about 1/4 of the way up, using a spoon if needed to help coat.
- Pull cone straight up and allow excess candy melt to drip off.
- Holding cone over wax paper, shake on sprinkles.
- Place cones upside-down onto wax paper until candy melt coating has set.
- Store in an air tight container.
Nutrition
Other Notes


These are so fun to make, even if it’s not a holiday! the kids LOVED them!
Thanks Ashley!
These are so fun and easy! I love how easy they are to customize for any occasion!
I know, we make these all the time!
We love doing this with our ice cream cones! Made these this past weekend for the 4th and they were perfect! So fun!
We did the same thing!
this is such a cute idea, my kids love dipped cones!